- Magical Record and NSFetchedResultsController: Core Data made easy
- UITableViewController and NSFetchedResultsController
- Magical Record: Simple Core Data
- TableViewController: Detail View
- Magical Records: Edit, Add, and Delete Records
First, we need some buttons to let us perform some actions on the table. Edit your view controller as follows:
- (void)viewDidLoad
{
    [super viewDidLoad];
	// Do any additional setup after loading the view.
    [self setupView];
    [self setupFetchedResultsController];
}

- (void)setupView {
    // Create Edit Button
    UIBarButtonItem *editButton = [[UIBarButtonItem alloc] initWithTitle:@"Edit" style:UIBarButtonItemStyleBordered target:self action:@selector(editNotes:)];
    self.navigationItem.leftBarButtonItem = editButton;
    // Create Add Button
    UIBarButtonItem *addButton = [[UIBarButtonItem alloc] initWithBarButtonSystemItem:UIBarButtonSystemItemAdd target:self action:@selector(addNote:)];
    self.navigationItem.rightBarButtonItem = addButton;
}
Now we need to setup methods for the two buttons. First, lets wire up the addTestRecord method we created in the last tutorial just to make sure our button works (and to give us some test records to delete).
-(void) addNote:(id) sender {
    [self addTestRecord];
}
Press the button a few times and your table should be growing. The insertion of records can look a little random, mainly because we didn’t set any sorting criteria when we set up our fetched results controller such as
self.fetchedResultsController = [Note MR_fetchAllGroupedBy:nil withPredicate:nil sortedBy:@"date" ascending:NO];
Now lets delete some of that test data…..
Deleting Records
Add the following code:
- (void)editNotes:(UIBarButtonItem *)sender {
    [self.tableView setEditing:![self.tableView isEditing] animated:YES];
    [self.tableView isEditing]? [sender setTitle:@"Done"]:[sender setTitle:@"Edit"];
}

- (void)tableView:(UITableView *)tableView commitEditingStyle:(UITableViewCellEditingStyle)editingStyle forRowAtIndexPath:(NSIndexPath *)indexPath {
    if (editingStyle == UITableViewCellEditingStyleDelete) {
        Note *note = [self.fetchedResultsController objectAtIndexPath:indexPath];
        // Delete Note from Data Source
        [note MR_deleteEntity];
        NSManagedObjectContext *localContext = [NSManagedObjectContext MR_contextForCurrentThread];
        [localContext MR_saveToPersistentStoreWithCompletion:nil];
    }
}
editNotes switches between editing and non-editing modes (and changes the button text accordingly). The second method checks the editing style and performs the relevant action, which in this case is deleting the selected note from the database. You also get the added bonus that swiping across a table row brings up a delete button.
Adding and Editing Notes
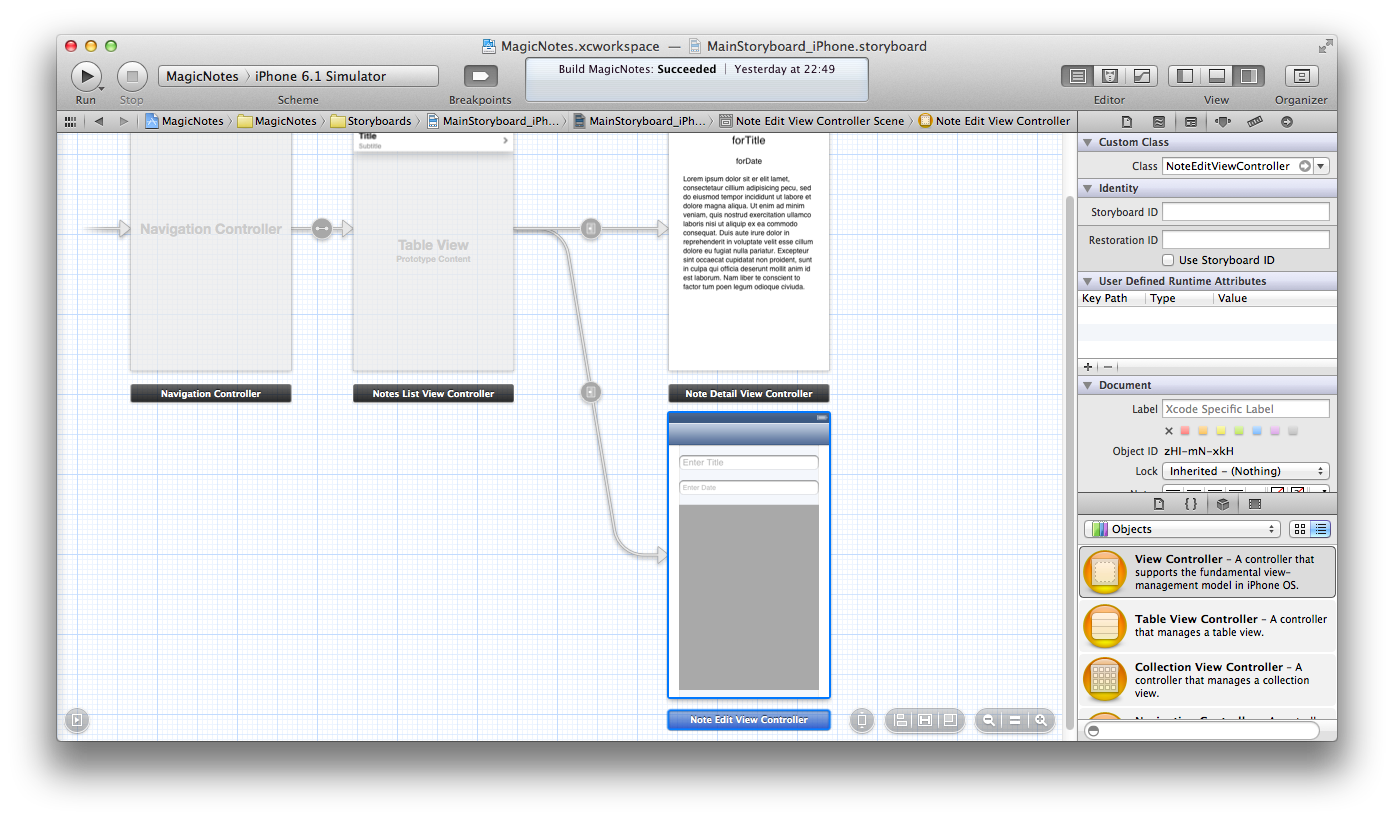
One caveat here is that it would probably make the most sense to have the edit and view note views combined. However, I decided against that so I could show how to use the editing accessory buttons. First we need to create an edit view, in much the same way we did for the detail view but with text fields replacing the labels. We also need to create a custom view controller called NoteEditViewController and a push segue from the list view named listToEditNote. After all that you should be left with the following layout:
Thanks to the generic ‘setNote’ segue there are just two additions to NotesListViewController. First, we change addNote to take us to our new view, rather than just adding test records.
-(void) addNote:(id) sender {
    [self performSegueWithIdentifier:@"listToEditNote" sender:nil];
}
Second, we add a new method to detect clicks to the editing accessory button (and not any other accessory button).
- (void)tableView:(UITableView *)tableView accessoryButtonTappedForRowWithIndexPath:(NSIndexPath *)indexPath {
    if(tableView.editing) [self performSegueWithIdentifier:@"listToNote" sender:indexPath];
}
Lets also go back to the storyboard and add an accessory button to the NotesListViewController. Click on the table cell and select ‘Detail Disclosure‘ under ‘Editing Acc.‘. Now if you click run you will be able to go from the list view to the editing view by either clicking the circled arrow that appears when you click edit, or by clicking the + symbol in the navigation bar.
Replace the top of NoteEditViewController.m with the following code. This adds a private interface that contains both the passed note (or nil for new notes) and a BOOL to indicates if we are editing or adding a new note. It then synthesises the note property providing the setNote method.
#import "NoteEditViewController.h"
#import "Note+Create.h"

@interface NoteEditViewController ()
@property (strong, nonatomic) Note *note;
@property (nonatomic) BOOL isNewNote;
@end

@implementation NoteEditViewController
@synthesize note=_note;
If it is a new note, a new MagicalRecord entity is created, and given the current date. Then the note information is given to the view input fields.
- (void)viewDidLoad
{
    [super viewDidLoad];
	// Do any additional setup after loading the view.
    [self initView];
}

-(void) initView {
    self.navigationItem.hidesBackButton = YES;
    UIBarButtonItem *cancelButton = [[UIBarButtonItem alloc] initWithTitle:@"Cancel" style:UIBarButtonItemStyleBordered target:self action:@selector(cancel:)];
    self.navigationItem.leftBarButtonItem = cancelButton;
    // Create Save Button
    UIBarButtonItem *saveButton = [[UIBarButtonItem alloc] initWithTitle:@"Save" style:UIBarButtonItemStyleBordered target:self action:@selector(save:)];
    self.navigationItem.rightBarButtonItem = saveButton;

    if (!self.note) {
        self.note = [Note MR_createEntity];
        self.note.date = [NSDate date];
        self.isNewNote = YES;
    }
    else self.isNewNote = NO;

    self.titleField.text = self.note.title;
    self.contentField.text = self.note.content;

    [self setupDate];
}

- (void)setupDate {
    self.dateField.text = [self.note formatDateAsString];
}
Finally we provide methods for the ‘Save’ and ‘Cancel’ buttons we created. If cancel is pressed then we want to delete the entity we created, but only if this was a new entity not already in the database.
- (void)cancel:(id)sender {
    // Dismiss View Controller
    if(self.isNewNote) [self.note MR_deleteEntity];
    [self.navigationController popViewControllerAnimated:YES];
}

-(void) save:(id) sender {
    self.note.title = self.titleField.text;
    // note.date is already set when datepicker changes
    self.note.content = self.contentField.text;
    NSManagedObjectContext *localContext = [NSManagedObjectContext MR_contextForCurrentThread];
    [localContext MR_saveToPersistentStoreWithCompletion:nil];
    [self.navigationController popViewControllerAnimated:YES];
}
What about this datepicker mentioned in the save method? At the moment the date is held in a freeform textfield, and a user could type anything in there and cause all kinds of problems. Instead, we change the input method for that field from the standard keyboard to the iOS UIDatePicker by adding to initView
    UIDatePicker *picker = [[UIDatePicker alloc] init];
    [picker addTarget:self
               action:@selector(dateChanged:)
     forControlEvents:UIControlEventValueChanged];
    self.dateField.inputView = picker;
We then use the dateChanged method to update both the notes date, and the date field.
-(IBAction) dateChanged:(UIDatePicker*)picker {
    self.note.date = picker.date;
    [self setupDate];
}
That’s it. Well almost. I’m going to add a couple of tweaks just to make the user experience a little nicer, but the general functionality is now all there.
A Few Extra Tweaks
Tap to Dismiss Keyboard
The keyboard likes to stick around once it has appeared. In order to get rid of it you can add a gesture recogniser to the whole view as follows.
-(void) setupGestures {
    UITapGestureRecognizer *gestureRecognizer = [[UITapGestureRecognizer alloc] initWithTarget:self action:@selector(hideKeyboard)];
    [self.view addGestureRecognizer:gestureRecognizer];
    gestureRecognizer.cancelsTouchesInView = NO;
}

-(void) hideKeyboard {
    [self.view endEditing:YES];
}
Then just call [self setUpGestures] in viewDidLoad.
Keyboard Hiding Text Fields
The keyboard also has a habit of appearing over the field you are trying to edit. To stop this you place a scroll view at the top of the view hierarchy and place all of the elements within it.

Then you write write a whole bunch of code to ensure the scrollview scrolls the edited field to the top of the screen, whenever the keyboard appears. Or alternatively, use someone else’s code. I like TPKeyboardAvoiding, and it has a very flexible license. One pitfall of this approach is that the scrollview consumes many of the event actions of it’s subcomponents so, for example, the text view’s touchedDidEnd no longer triggers. There are ways around this, but I think I’ve written enough code for this project.
Conclusion
Hopefully this has shown just how easy core data can become with MagicalRecords. I haven’t tackled any of the serious things it can do such as using multiple threads, but even without the more advanced features it still greatly simplifies creating and ten fetching from a database. I hope it has also shown the power of using the NSFetchedResultsController to automatically handle a table’s behaviour as the data source changes.
This is also my first tutorial, and was written in one big block. As such any comments/criticisms/questions are greatly appreciated. (I will also be rereading it a number of times over the coming weeks just to make sure it makes sense).
The full project (with CocoaPods installation of MagicalRecord) can be found here.